
I can’t remember how old our daughter was when she first tried sushi. But what I do remember is that she was very little and how my husband and I were staring at her devouring salmon in a moment of bewilderment. At a time where most of her peers were begging for McDonald’s and Pizza, she wanted sashimi rolls.
So for Halloween this year, she decided to go as her favorite food ever. Sushi!
Here’s how to make your DIY Wasabi Ginger Headband for your Sushi costume:
- White sweatshirt
- White Skirt
- White tights
- Black headband
- Pink, Green (lime and emerald) and White Felt
- Glue Gun
- Scissors
- Orange Pillowcase
- Green infinity scarf
- Chopsticks
- White adhesive velcro strips
- Safety pins
- Pillow
Things to note about the costume items:
The green infinity scarf, headband and velcro strips I picked up at Dollarama. The felt is from Michael’s craft store. Chopsticks courtesy of my friend Jenny. The rest was Amazon and pre-owned clothing items.
HOW TO MAKE THE PIECE OF SALMON FOR THE SUSHI COSTUME
This is so easy it’s not even funny. Please excuse the night time crafting photos on my office floor. This is where I do 90% of my crafts.
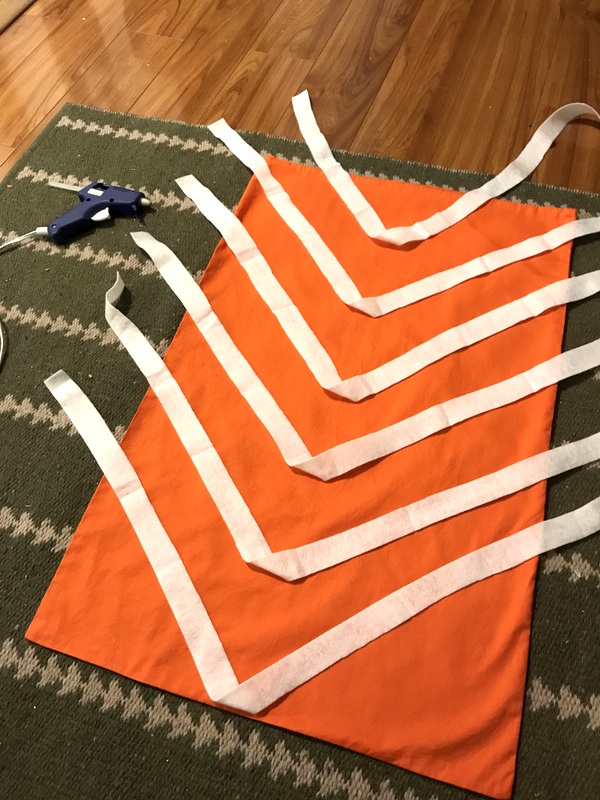
Take an orange pillow case and lay it flat on the floor. Cut out some long strips of white felt. Lay out your felt on the pillow to create your pattern. Glue THE MIDDLE OF THE “V” SHAPE STRIPES to hold your stripes in place first.
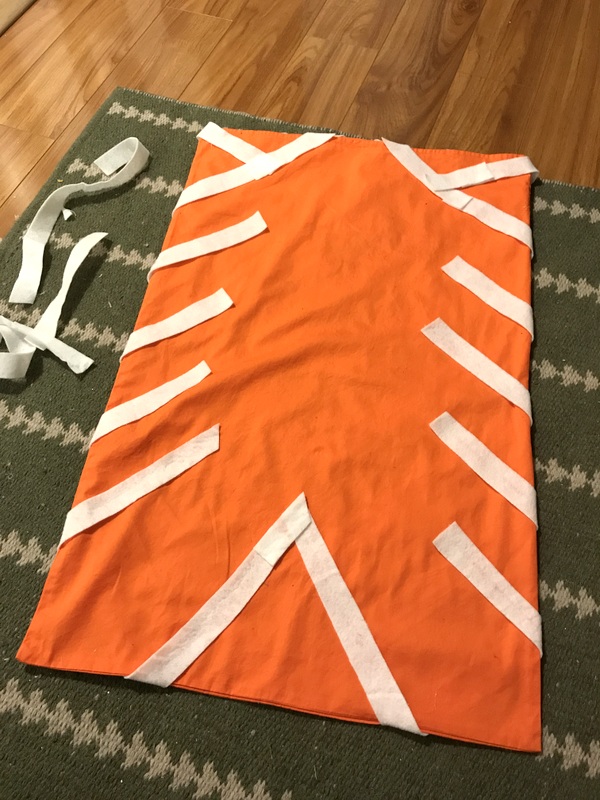
Then use the glue gun to glue the rest of the stripes around the pillow. This will help keep your pattern and stripes in place. REMEMBER to leave an opening at the top to actually put in your pillow into the pillow case.

THE FRONT (the pillow case opening is at the top)
THE BACK (after it’s done, just insert the pillow into the pillow case and glue shut).
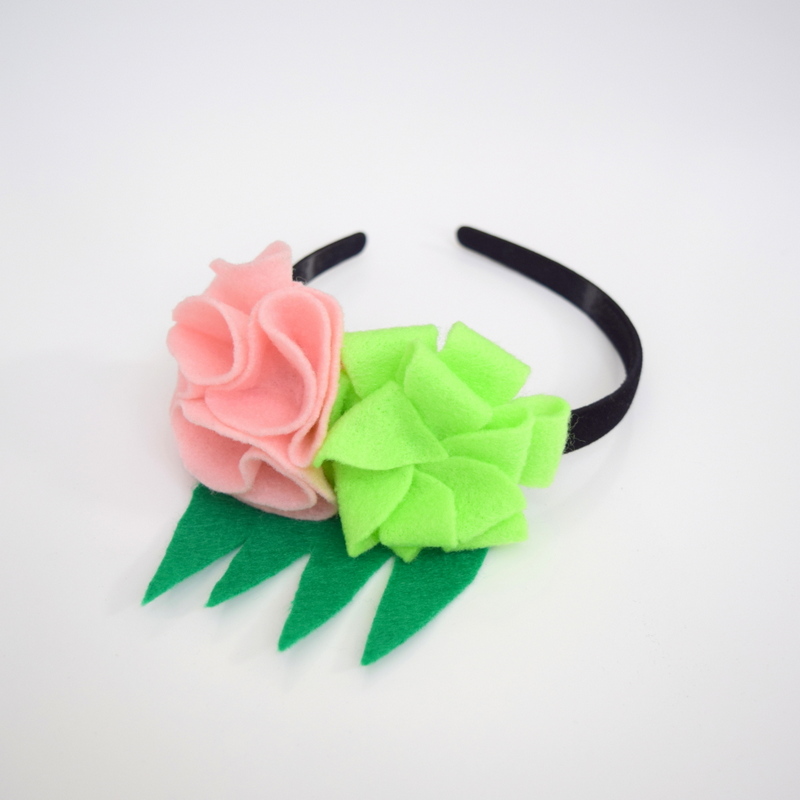
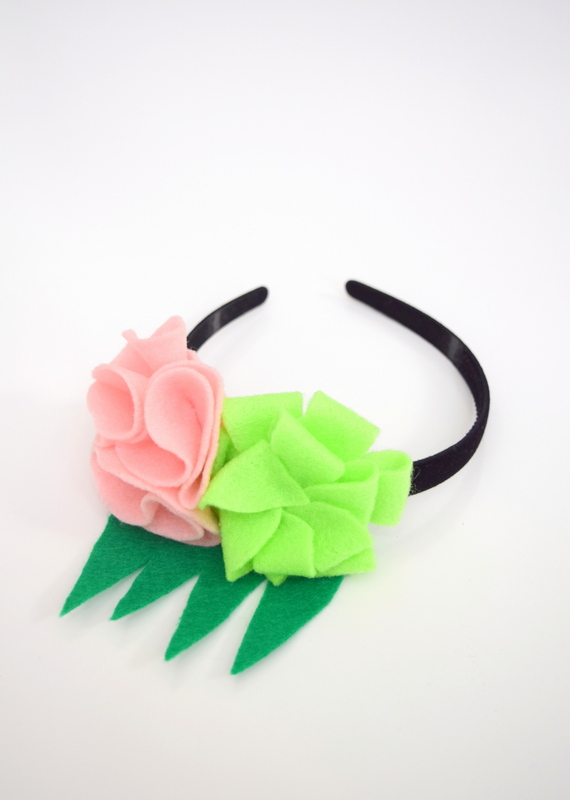
THE WASABI GINGER HEADBAND

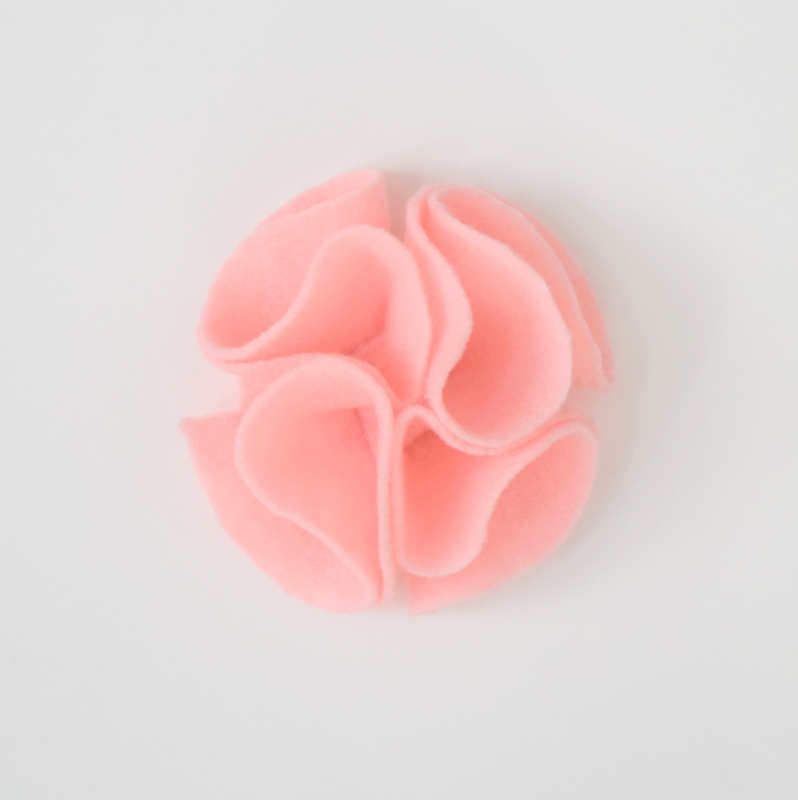
THE GINGER HEADBAND PART
Cut out 4 big circles and one smaller circle.

Take one bigger circle and fold it in half. Then fold it in half again.
Using your glue gun, glue the folded piece onto the smaller circle.

Repeat x 4.


Glue the four middle pieces together.
THE WASABI HEADBAND PART
Cut two green circles. One should be slightly bigger than the other.

Cut out a starfish meets ninja star like shape.

Glue ends of your starfish ninja star to the center.
Repeat with your second green circle. Then glue the second wasabi piece ON TOP of the bigger one.

Glue both the Ginger and Wasabi onto the headband. Cut out a small piece of fake grass and glue it to the headband.

Putting the Sushi Costume and a Wasabi Ginger Headband costume together
Take adhesive white velcro strips and put them on the back of the orange pillow. Stick the pillow onto your back (if you can get someone to help you, this would be obviously make this easier.)
Use safety pins to hold the “salmon piece” into place at the top by the shoulders. That pillow can sag due to the weight so both of these items help hold the pillow in place.
Step into the green infinity scarf and put it around your rib cage as the seaweed wrap. Add headband and chopsticks onto your hair. And you’re done! Happy Halloween!

COSTUME UPDATE:
If you’re looking for the full costumes, I am sorry but I have since removed the images of any previous Halloween costumes I had made over the years, due to the various copyright violations. This included fake Halloween costumes being sold, using my children’s images illegally.
FOR MORE SUSHI HALLOWEEN COSTUMES VISIT THESE GREAT BLOGGERS:
- DIY Salmon Nigiri Sushi Costume
- Easy Halloween DIY Sushi Costume
- I’m a piece of Sushi (Halloween Costume DIY)
- DIY: Halloween Sushi Costume (No Sew)
- Dress up like Sushi for the Best Group Halloween Costume ever
4 Comments
Laurie
October 21, 2018 at 11:07 pmWhat size are the circles for the ginger and wasabi?
Alex
October 23, 2018 at 11:04 amThese were made for my daughter’s head size which is smaller than mine, so approximately the size of a small teacup saucer. You can change their size according to your own personal preference or needs.
Shari
October 26, 2019 at 11:08 amThank you so much for this amazing idea and instructions!! I whipped it together for my 13 year old last minute and she loved it along with everyone else! We did not have time to order the orange pillowcases and the ones locally were $15 so instead I bought some orange felt (3/4 of a yard 70″ long I believe which was more than was needed) from the fabric store for $2-$3 and sewed a rectangle “pillowcase”. The non-sewers could probably hot glue the seams : ) It worked perfectly. For the belt, I bought a piece of green fleece from a bolt (1/4 of a yard I think, 60″ wide). The fleece stretched and thinned out so she was able to tie it and then wrap the ends back around and tuck them in (it basically made it around her waist twice when stretched). I supposed I could have sewn the ends to make it an infinity scarf, but this worked and was easier. All in I spent $10 plus glue sticks that I already had on hand.
Amanda
October 27, 2024 at 2:21 pmThanks so much for sharing!
Just a small thing worth noting, it’s not fake grass, it’s actually a shiso leaf that often accompanies sushi. Now you know!